Friday, April 25, 2014

Hearth Updates

Yesterday with the post about my sweet Ikea hack, a few of you may have noticed the difference in the planters on the hearth from the 'before' pic.

 Before:
After [and after I realized I should just turn off the TV for living room photos]:

I added a much-needed pop of green and life, in the form of rubber succulents, that I picked up super cheap at Hobby Lobby:
 And I love them.  For some reason I mostly kill succulents [aren't they supposed to live forever no matter what? Or am I the only one under whose care they wither and die?]  So I picked all these up for about $15.
I also cleaned up the look of the side table on the right, with some books and a real plant [those, I can keep alive].  But if you look closer...
It also houses our DirecTV receiver, Roku, and BluRay player.  We have to have them, and I'd rather not see them, so I disguised them by putting a bunch of other stuff around.
Now on to a solution to hide all of the wires...... To Be Continued!

Thursday, April 24, 2014

Important Lighting Decisions

Because everything involving lamps is life or death, right?! 

 Everything in the house so far has been a 'live with it until you get an idea' style of decorating. And the living room is the ultimate showcase of that [hence, almost nothing has been done].
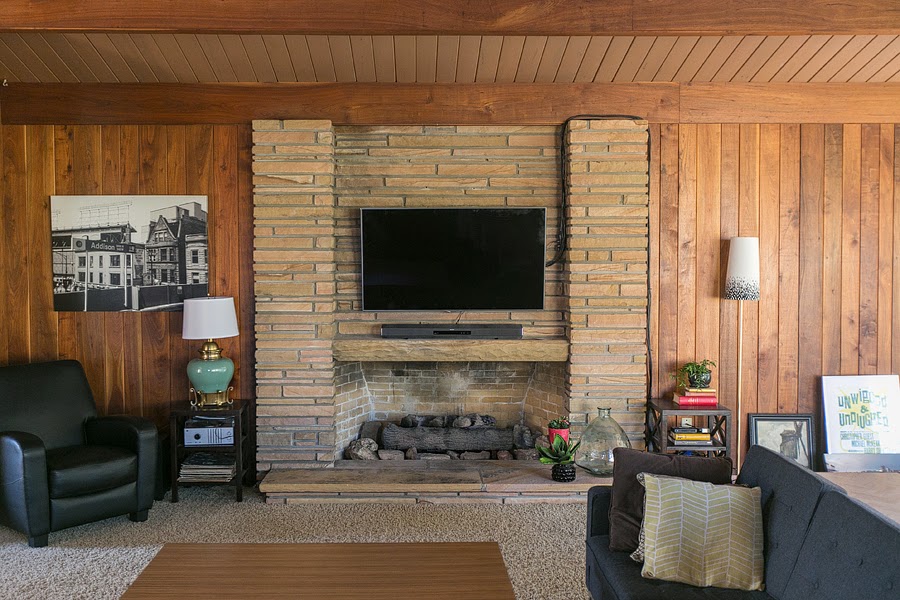
Well, the time has come to finally address the lamps in the room.  The one on the left of the fireplace is adored and petted almost every day [love that guy.  AND he was only $10 at an antique store in Farmington, MO] but the one on the right was just 'meh' and never felt quite right.  I just stuck it there so we could have light in the room. 
 Then one day I was putting something away in our bedroom and noticed that the floor lamp [Ikea, circa 2011 I think] I put in there was quite a bit taller than the living room one, and I decided that the height was what I needed to finally make me happy again [not really, but everything is more exciting when it's dramatic]. 
 And the proportion looked muuuuch better!  Now, onto making it look better in the space, which turned out to be an Ikea hack! ...does that mean I'm cool?  Ikea hacks are cool, right?

During my great 'Battle of the Beige' I decided that I'm going with a lot of graphic black and white patterns, charcoal grey and black stuff, and pops of color like mustard, aqua and orange, with brass and dark bronze metals.  So the screenprinted silver lamp shade had to change.

Nothing that a little paint couldn't fix!  I got out some black and grey fabric paint [of which I have hoards stashed away in my crafting supplies] and a brush, and got to work.  My dining room table proved the very best spot, because it also has a nice view of the TV.  Always a plus!

Starting with the black first, I made that a nice base at the bottom and feathered it out a bit.  Then added the grey, and made a pretty ombre effect.  And it only took about half an hour [or one episode of Archer, however you choose to measure time]

 
Then it was time to turn my sights on the base, which needed to be gold instead of silver [everything should be gold!]
Prepping the base involved shoving a plastic bag into the socket, and covering the threaded area for that washer thingy [I think it's only an ikea thing, but that works remarkably well for holding the shade on], covering the switch with scotch tape, and cutting off the excess for a clean edge.

And while I was already getting out the steel wool and spray paint, I decided that this little vignette on my hearth needed help too:

 That fiberglass rocket planter, which I've had since high school, needed help.  It was pretty shabby.  So I popped off the rubber feet and made it pretty again!

 [better.]

And how the view of the living room went from this:
 to this!
 Not exactly a huge change, but it's a view I'm finally happy with.  The lamp is a good height, and the extra black and grey on the shade give it enough visual weight to be seen.
 Here's a bit of a different view [still in major love with all of the windows]:
 I like the way it looks, but it's still far from finished.  I still would like to:
- add a credenza for some hidden DVD storage
- get a sculptural plant [fiddle leaf fig is #1 on my list]
- finally make some damn decisions and hang stuff on the walls
Then of course I'd like to get different pillows [you didn't think I'd keep BROWN pillows on my GREY sofa forever, did you?  I'm better than that. I'm just picky and haven't found "the ones" yet.], get a different chair to replace our big-box-store black recliner, etc. etc.  
But it's coming along :)

Wednesday, April 16, 2014

I can shut the doors!

The room off of the kitchen, which we've come to call the Magnitude Room [named after Magnitude from Community on NBC] has made HUGE strides since we bought the house.  It's even looking quite pretty, dare I say.  
When we bought the house, it looked like this:

 Pinkish beige everywhere.  Mismatched shelves.  Weird hardware placement.
So I filled in the holes from the knobs, primed and painted everything [which I shared in my post about painting ALL THE THINGS.] and then it started to look less pink:

 Then it pretty much sat in this state for, oh, a month.  Oops.  And every time I would instagram a photo that included that room, I'd cringe at the cabinet doors slightly ajar [if the doors would get shut, it would be a HUGE pain to try to get them open again.  You know, because of the whole 'no knobs = no way to open the door' thing].  But really, dear readers, the issue that was holding me up was a paralyzing fear of effing the new handles up.  I adore the handles I picked [these aren't the exact ones; looks like they're out of the size I got, but yes, they're super affordable!], but they're 9 inches long, and aaaannnnyyyy little imperfection in getting things square would turn out super noticeable.  And it would drive me so crazy, I would have to move.  You know, that old story.
I finally decided to nut up and just get it done, so I could close those damn doors again!
I tried the YHL method with the cardstock template and taping it to the doors...


And immediately abandoned it.  My cabinet doors are slightly rounded on the edges, and I just didn't feel like I could get things squared up enough to be absolutely perfect.  So I just did a lot of "measuring, marking, measuring again" business.  And got her done.  So now the doors are shut, and some shiny brass is classing up my house!  Add to that the new Nate Berkus rug I scored for $45, and it's getting soooo prettier:
 Let's see that before and after again, since it makes my heart happy:
 BUT THAT'S NOT ALL.  I'm just in all kinds of a sprucing up mood, and the very same day, I picked up some gorgeous midcentury sofas and a chair [I practically stole them, they were so cheap], and now the room looks like this:
 Not sold on the placement just yet, though I do love them.  I just need to live with it a while before I settle on something.  But until then, I'm just admiring these lovely ladies' curves:

 The matching chair, in its' temporary-yet-beautiful home, the palm I found at Walmart for $5, and the house maltese.

 I love this view :)
______________________________
The couches are only *mostly* perfect though.  They had been recently reupholstered in a lovely greenish tone that uncannily fits nearly everything in my house, but they did one side of the cushions in this:
And yeah, it's just...out. For all to see. So I'll keep you posted with a remedy, hopefully sooner rather than later.

Crazy Dog Lady

A few weeks back, on my tour of the house after we had been in it for a whole week, I showed a glimpse of a small bathroom we have near the garage, which I've come to call The Dog Bathroom. Since it's small and unassuming [and not scary to decide on what to do and/or doing it], and I kind of like the original 4x4 ceramic tile, I fairly quickly decided on a color and idea for art on the walls, and got to it!  Last week the room went from this:

To this:


I chose a navy with some green undertones, hoping to make the beige tile less pink.  I don't know if I succeeded in that, but I still like it.  In fact, I love this color [Blue Scottish Loch from Walmart, btw.  I mentioned in the long painting post a while back that I get pretty much all of my paint from Walmart, and I still do!] Then, since it's The Dog Bathroom, I decided that paintings of dogs should grace its walls.  There are 8 paintings, 7 of which I painted, and one that my mom painted in 1978 [and it's of a beagle!  perfect.  It's the one hanging to the left of the sink, above the hand towels].
And there's room to grow, so I have more room for more dog paintings! 


Sooooo...does the fact that I have so many dog paintings, and not just paintings of my own dogs, make me a crazy dog lady?

Wednesday, April 9, 2014

Exterior: Phase 1

Today marks the official "1 month" mark in the house!  Moving day was March 8, so that makes the 9th the first full day in the house.  To celebrate, albeit in a very boring adult way, a post about our home's exterior and the changes we've made!
One of the upgrades at the very top of our list once we bought our house were the gutters.  The sad, sad, drippy gutters.  I'm certain they were original to the 1968 house, and they needed major help.
Seams everywhere, all leaking:
And they had some weird placement issues, like here, where it just empties out onto the roof [which, over time, paired with an aging roof, has made part of the fascia sag, which is also on the list to fix]


 So I called a gutter company, had them quote it, and finally - after several weeks of either being snowy, icy, or dangerously windy - we got pretty new gutters!

Placement issues fixed, no seams, and fancy gutter helmets that match the roof to keep leaves out!
We went with white because - fairly soon, hopefully - the cream colored trim will be OUT. And fresh, clean white in its place.
 Below, you can see part of the back patio, where a mountain of leaves had been long glued to the cement.  The old gutters would leak all of the rain/melted snow onto the patio right there into the leaves, and it would refreeze every night.  So we had to wait until a consistent enough thaw to get them off.
 And we did!  My mom came and helped me, and after 3 hours of raking, shoving into trash cans, and hauling them to our field, they were all gone.  You can actually see the patio now!

Below, see the old downspout configuration [which, also, notice that there are no elbows on the ground from the downspout.  So essentially water just emptied right onto the patio, next to the house.  A HUGE no no when it comes to trying to keep water out of your basement.  Whoooooo does that?!]
Now, no pipes!  They've been moved to corners for a better look [which I love!]  And they're properly drained from the house.  Like it should be.
 Another view of part of the patio, which I'm not sure if you've seen before....  I adore this area and can't wait to get it all comfy and ready for outdoor sitting.  I've also given the ivy on the wall a bit of a haircut [which it so desperately needed] and I'm watching every day to see which plants green up next!

So, we're officially grown ups.  We excitedly spent money on new gutters.  BUT - in true homeowner fashion, the shiny new gutters just highlight everything else that needs to be done.  The white gutters made the cream trim and pink siding look sooooooo yellow.  So next up on our exterior list [aside from pretty patio furniture and decor, of course] is painting the house!  
Here are a few photos of it now, next to what it'll look like after some [quickly photoshopped] paint and stain on the fence:

 SO MUCH BETTER, RIGHT!?  I'm itching to break out some grey paint and get to it....

Crazy how different this view from our driveway is!  The fence is gonna look hella good with a good walnut stain.  Stay tuned!