Showing posts with label exterior. Show all posts

Monday, May 18, 2015

Grand Entrance

The long driveway of the Haus of Pane is marked by a beautiful mailbox. See?
Yeah.  Pretty far from that.  Nothing against a plain white mailbox - it gets the job done - but this one has clearly seen better days.  It's almost always missed when I give directions on the phone, thus the driveway is missed, and pizzas get cold while waiting for the driver to find the house.  And it must just be invisible to everyone, because I'm certain it's been hit.  A lot.  Last fall I noticed the door was open, tried to close it, and it didn't line up - so I think it was hit overnight.  The door falling open was a constant issue too - our mail would sometimes be wet inside of the mailbox.  Not just damp from raindrops while exposed between the post lady's car and our box - letters would look like they took a swim in a pool for half an hour, then made their way inside the box to sit in their own puddle. 
It didn't take long before we had had enough, and vowed to rectify the annoyance as soon as the ground thawed. 
[fast forward to April, when the ground thawed]
We sketched out a few ideas of stuff I had floating in my head - I wanted it to look MidCentury Modern [or at least reminiscent of that style] but not break the bank.  Did you know that the really cool mailboxes out there can cost a few hundred bucks?  For JUST the mailbox?  I love this one, but I'm certain that's just the box.  Post is sold separately.  And I'm just too much of a tightwad for that ;)  So! I designed something that could incorporate a normal-priced mailbox, and add some decorative bits for pizzazz [people just don't say pizzazz enough].  Said decorative bits were to be simple, but large enough to incorporate large numbers [so people can, you know, see them] and I wanted a nice angle to echo the angle of our gorgeous house.
Once we decided on a mailbox - super simple design in classic black - and a post [nice and sturdy in case it gets hit], and decided the decorative bits would be made from 1x8 boards, I made a crude sketch in Illustrator [to scale, of course] to make sure all the numbers were going to work out:
Brandon set up shop in the garage and did all the cutting, and I did a loooot of sanding:
Then there was priming and painting and drying [photos MIA.  but I'm sure you can imagine what painting looks like]  We went with the same grey as the house, so everything matches!
We picked these numbers [which look a lot like these Neutra numbers but a whole lot cheaper]
And then it got a little weird.  The installation calls for drilling a hole a little larger than the screws, put the screws in the number, put a bunch of silicone in the holes, then dropping the numbers & screws into the holes.  So you basically glue them onto your house [or, in this case, 'decorative bits']
Problem is, the screws were longer than the thickness of our boards, and they'd stick out the back, so we just decided to glue the things on, sans screws.  Taking out a step is always fun.
Seems good so far!  I'll of course keep you posted.
THEN!  After two weekends of solid rain that foiled our best laid plans, we finally had some sun on a Sunday afternoon.  And my digger got to digging.

"Oh, no!  Sorry, Brandon I guess I'm just bad at digging - and you're really good at it"  ;)

He dug the hole with a post hole digger, flattened the area around the decorative bits to make room for it to spread out and be even, and then mixed the cement so the whole thing is more permanent-like.

For a few hours they existed as equals, though everyone that passed the two of them knew they were far from equal.
And - on a Monday morning - I killt it.  
[then my digger had to work super hard to get the base out of the ground - turns out it was about 3' long, all underground.  I was legitimately shocked.]
_______________________
Soon after, Phase 2 happened - the prettification of the mailbox!
To set it off, and to keep the grass from getting tall and obscuring our beautiful numbers, we made a pretty rock bed all around.  We chose white marble rocks, because they fit with our clean look, but were also surprisingly cheap!  $3.78 a bag, and while it took 5 to fill up the bed, that's still less than $20 to make it look super fly.
Add a perimeter of paver stones to keep the rock bed in check [about $1.15 each] and it's done!

The mailbox itself has a magnetic closure, so no more door hanging open!  And the flag is metal too!  Feels nice and sturdy.  And if you see the back, you see the brackets my metalsmith [Brandon, as I mentioned in the previous post] made and powder coated in black.  The brackets are attached to each board with screws, each board is attached together with hidden dowels, and they have a 90 degree turn which is attached to the steel post.  This thing isn't going anywhere.  [And if someone hits our mailbox now, I kind of really hope it does damage to the hitter's car.]
This summer the grass will fill in, and in the fall I'll plant some bushes around the box and on the other side of the drive [for symmetry, of course], and we'll finally have ourselves a pretty entrance!
______________________

Everything seemed perfect for a week, then we both noticed a few times that one of the paver edges looked wonky.  One time I fixed it, and once Brandon fixed it, and it happened again.  Which means our mail lady is running over our it with her mail-mobile. 
This means war.  I have ideas for defense/retaliation.

Friday, May 15, 2015

Curb Appeal updates!

...even though you can't really see the front of the house from the curb ;)

So!  It's been really quiet over here lately, but it's not because we've stopped work on the house - it's because 1) I owe you a biiiiig post on the kitchen, but that's overwhelming.  And there's one more thing I want to fix before it's ready..... and 2) there have been a couple of smaller, fun projects, but the majority of our focus right now is going to some larger [and therefore expensive and not as fun to talk about] projects like new carpet [!] and paving our driveway.
BUT!  It's Spring, and as usual, I spruced up a few things with some plants!
I've been dreaming up some rectangular metal planters for the front, to make more of a defined edge to the top bit of the porch [a few people have fallen off of the step because they don't see it, so I think maybe some definition may call more attention to it.....maybe?  Side note: the house has been here since 1968.  If I know 4 people that have fallen off of it, how many over the life of the house have fallen?!  Or is it just the circle of people I know?]  I even sketched up something for Brandon [my metalsmith] to make for me so I wouldn't have to spend $400.  On metal boxes that will get filled with dirt. 
However, on a recent trip to Chicago [and therefore IKEA] we ran across these great black planters!  Not as square as I had wanted, but dang if they weren't cheap - $35 each.  So they came home with us!  And I filled them up with dirt. 
From the left we have: calibrachoa, something called lantana, rosemary, verbena [in a gorgeous purple!], and something called bacoba.  Should fill out nicely and be all drapey and flowery :)
With mom's help [and her kick in the pants] I also added some mulch around the naked boxwood I planted last fall, and edged it out with some stones we got for $1.25 each for another project [you'll see that next week!]
And we got a door mat!  It took me a while to find one that's wide enough for the double doors, wasn't ugly, and cost less that $1,000.  I love the look of coir mats, but just couldn't find a wide one that didn't have a frilly pattern on it.  And getting two at IKEA and putting them side by side would be cheap, but also look messy.  So I got this one, and it fits the bill nicely!  No more random dirt and mud should sully my foyer floor.
Last spring when I spruced up the flower bed, it looked like this [hello, weird pink & yellow house!]
And last fall I cut back the roses all the way, because they were pretty disobedient last summer.  Just a mess of branches all sticking into each other. But I think I should have maybe not done that....  Because now they just want to spider out.  They look really healthy - loaded with buds - but just.....low.  Does anyone know what kind of rose this is and what I should do with it?
Anyhoo.  Back to what the entry looked like in January of 2014, when we bought the house:
[yikes] [...see what I mean about needing an extra long mat for the double doors?!  that puny thing looks sad. and off-center.]

And now, this!  Painting the house and the doors reeeeally make the big difference.  But also, flowers!
Looks good, but now all I can see is the other things i was to upgrade [or "buy"]:
Brass knobs to really pop against the doors [but I want REAL brass. Not brass-plated or brass-colored steel. Apparently I have expensive taste in door knobs.  Who knew that was a thing?]  And a new, super cool, modern light fixture.  But the nice, big, two-bulb [one up, one down] kinds are a couple hundred dollars.  And I need three.  Some day.... [or maybe I'll get my metalsmith on that.]

Saturday, November 15, 2014

Paint it, black.

I see a wood door and I want to paint it black*

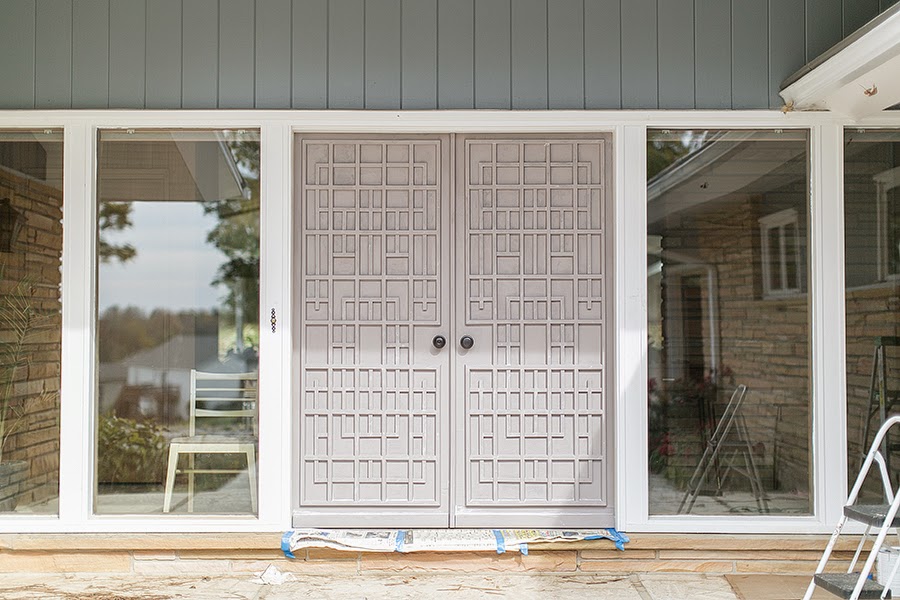
The front doors were one of the [many] things about this house that we fell in love with.  Certainly unique, and definitely well-built, not to mention they were meant to be with this house.  The architect and original home owners decided on these, so there was no question that they should stay here. That kind of purposeful design is what Brandon and I are drawn to buying, and saving.  What kind of MCM enthusiasts would we be if we just replaced them with plain metal doors? [which would honestly be all we could afford. intricately designed wood double doors would not be surprisingly cheap; they'd probably make my heart stop.]
They had definitely seen better days, but were structurally sound.  Before another wet, cold winter sets upon us, I staged a door intervention to make prevent further deterioration. 
This is how they looked the day we first saw the house:
Here they were a few months ago [already I feel like the hot summer has taken some more toll - the color looks a bit more faded than last December]
 And here they are now:
 I had been brainstorming about it all year, deciding what to do [doors on or off?  what color? how the heck do I sand all this?!]  But first thing was first - we had to make them stronger, and we had to make them work better.  Over the years, lots of use had split the astragal [I learned that word from The Adam Carolla podcast, but had to google it for the spelling ;)], making the latch mechanisms less effective [so pretty much, if someone kicked reeeeally hard a few months ago, they probably could have kicked in the doors, 80s action movie style].  And while I was at it, the upper latch needed to be cleaned, as it didn't want to move at. all.]  Here's what they looked like:
 The upper part of the astragal had been split and repaired, but the lower hadn't.  So my plan was to: a. pull out all of the screws
b. pull off the whole astragal, so I could get to the latches to properly clean them
c. clamp the bottom split part and glue it back together.

Luckily, I only got to the first part when I realized it could be easier than that!  I pulled out all of the screws, then found that the upper latch worked absolutely fine.  I attributed the non-workingness of it to the bottom not being properly aligned with the slot in the floor, so the upper latch probably wasn't latching into the correct spot.  So I moved on to the clamping and gluing.
I used J.B. WoodWeld for this job, since my parents have raved about how quick, easy, and super strong it is.  And it is!  Squirt an equal bit from each tube, mix it together, apply to the spot that needs fixing, and it's done. 
 It says 'no clamping necessary' but they clearly hadn't seen my door. So I clamped it.
 Once it was dry and sturdy, I put the screws back in [I had to get Brandon to help me with this - they're 2" long screws and I, for the life of me, couldn't get them in straight.  And I have a tendency to strip screws, so I left that up to him]
BUT.  That's when my hunch about a couple of the screws proved me right.  There were these two holes at the top, on the inside [clue #1 - no other screws were visible from the inside of the house when the doors were shut, and clue #2 - they were super shiny - i.e. new]  So when those two screws were put back in, the latch didn't work again!  So at some point, the previous owner fixed a split astragal with screws.
 And when they did that, they essentially screwed the latch shut:
 So I kept out the screws, scraped out the bit of wood putty that was in the crack with a knife, and put that WoodWeld in there too.  Done!

Now I could get to the bigger job - the painting.  Which of course involves a ton of prepping, especially with these doors. These doors were covered in a veneer, which when outside, needs a lot of maintenance.  So over the years, day after day of the hot afternoon sun had shriveled up that veneer, and it had to all come off.  Here's an instagram pic of the day I started:
 It came up pretty easily, especially on the bottom 2/3 of the door.  I also used a utility knife around the trim pieces to try to get a really clean line. 
And after hours of scraping, here's what they looked like:
 While I was scraping [and cutting and scraping and cutting and scraping], once I got to the bottom of the door I came to the bottom trim piece.  It has always bothered me.  For one, it was kind of coming off of the right door [there was about a 1/2" gap] and two, the spacing seemed off.  It just didn't seem to belong:
 I was certain it wasn't original to the door, so I ripped that sucker off. [and quite easily, I might add]
The two-toned aged veneer underneath justified my decision:
 With a door as purposefully laid out as these, the spacing around the edge of the trim should have been the same all around the door.  And it was!  Originally, anyway.  I just figure the bottom of the door, which sees the most exposure to the elements, was the first to decay.  So the original trim piece came off, and a bigger one went on, to cover up the old veneer.  Most likely because someone knew the H U G E job it would become to take all of the veneer off.  But I was there to restore, renew and refresh, so I ripped off that old veneer too. [again, quite easily.  I just pulled it off with my hands - no scraper needed]
 So!  After all the old veneer came off, the whole thing got a good sanding, which I did with the Black & Decker Mouse, and its nifty pointed surface [for all of the tiny areas that make up this door].  So - that bottom trim that I had ripped off?  It turned out to be walnut, super sturdy, and aside from the weathered outside, very strong.  So I took the pieces over to my Dad to have him rip them down to the size they originally would have been. [bonus of moving back to your hometown: access to all of Dad's power tools, and Dad to use them for you ;)]
And after the good sanding, and some small holes filled, they looked like this, #nakedandafraid:
 I then primed the doors with my favorite primer, tinted gray:
 Which revealed that all of the tiny nail divots showed up a lot more than I thought they would, so I caulked them along with mitered corners, and of course where the trim meets the door [I should be able to power wash these doors, and no water will creep in to destroy them]
 Then - FINALLY - it was painting day!  [which I teased on instagram - seriously, why aren't you following me?  You're missing out on all sorts of food and dog pics, and occasionally a house pic :)]

I used Rustoleum Topside Marine Paint, because it's meant to withstand a lot of extreme weather.  I definitely don't want to have to sand and paint every couple of years - I want this to LAST.  
Why black?  I also debated on this a bit - a fun color would be nice!  But honestly, I can't think of a color I'd want for the doors that I'll love for years. And again - I don't want to have to do this again for a long time.  Plus I fell in love with the classic black lacquer doors in London, so I didn't have to waffle on colors for very long :)  On it went!

 And that, my friends, took a loooong time.  I'm using a 2" brush in that pic, but ultimately ended up using a 1" brush.  The smallest little rectangles are about 1.5" wide, and the small brush allowed me to be super anal about brush stroke direction, which ultimately makes for a smoother, prettier paint job.  I thought about a sprayer, but some of the trim pieces [like in the left half of the pic above] are 90 degree angles, so I felt that would also take a while, and cause for more drippage possibility. 
 So I painted my double front doors with a one inch brush.  Three times.  And in the spring [once I have a bit of separation from the project and my eye doesn't twitch when I think about it] I'm gonna put an other coat on, just so it's suuuuper glossy and smooth.  
Just for fun, I made a gif of the different stages!

While I was on the black door kick, I turned my sights to a back door of off the kitchen.  It, too, was a solid wood door with an aging veneer:
 Nothing was wrong with it structurally, so it got a good sanding and a coat of paint:
 [but this time I got to use a big roller for the job, so each coat - one of primer, and one of paint - only took about 5 minutes]

Much better, and cleaner :)

Google images shows album covers that say "Paint it, black" and "Paint it black"  Those Rolling Stones are never going to get anywhere in their careers if they can't get their shit together over something like how to spell a song title....

Wednesday, June 4, 2014

Thanks, Patio!

We love grilling dinners, eating outside, and just having a beer on a great patio.  And now, we happen to have a GREAT patio!  Once it warmed up we gave it some attention to make it extra pretty and inviting.  Now it's perfect for relaxing outdoor dinners, as long as those damn gnats stay away from us.  Thanks, Patio! [...anyone get my slightly obscure reference?  anyone? take your guess in the comments and win extra cool points with me - don't get too excited here - Megan cool points are worth literally nothing]

So last I showed a glimpse of the patio, it was right after we got new gutters, and it looked like this:

 TONS of potential, but kinda sad [granted, it was early early spring, so nothing was green and it was just kind of dead and blah]
And now, after a lot of cleaning, furniture buying, plant planting, light stringing, it looks like this:
 !!!!!!!
I seriously love it.  Probably should have swept up the extra leaves, and weeded the bed of rocks, but I'll just call it an 'approachable' yard.  Nothing can be too perfect, eh?
 I wanted to stay true to the late 60s/early 70s feel of the house [which Brandon and I just so happen to love anyway, so that worked] and have this eclectic, comfortable boho feel.  Hence the sweet double-decker macrame plant hanger that belonged to my Grandma, and the fun acacia wood plant stands I found at an estate sale for $6 a pop [and after 4 coats of tung oil they were water resistant]

The lounge chairs are from Lowes, and they're just PERFECT, in my humble opinion.  Beautiful and comfortable, just like me. 
The tables are for resting your cold beer or a hand-squeezed margarita, and were a little DIY solution/substitution to a ceramic garden stool [which I love, but I don't love spending $100+ on a ceramic stool]  I got these big planters on sale for $35 each, turned 'em upside down [with little rubber furniture protector tabs on the bottom so the glaze won't rub off on the concrete] and added a porcelain floor tile from Lowes [for a whole $1.68] on the top.  Done and done.  And if I change my mind [or if I find some really cool vintage wire tables somewhere] I can flip them back over and I have big planters!  Which I love filling up with plants and stuff.
The ivy has greened up and filled out nicely since weather has warmed, so I love that little corner [and of course I have a dog stuck in there!  I'm the crazy dog lady, remember?]

 Separate from the lounging area, we have a nice little dining area, with a gorgeous handmade vessel holding - my favorite - succulents:
 I'm excited to see these plants mature - the purple queen [in the bottom level of the hanging planter] will get really long, and there's rosemary in the white planter in the pick on the right, so that'll get taller [I think it should, anyway]

And looking to the right from the patio, into the weed-riddled rock bed, is a hillside full of this green grassy stuff that sprang up in April.  Which it turns out, is all daylilies.  And it is FULL of buds, ready to go any day:
I'll post updates as my yard explodes into color, and also, as the outside of the house changes - we're officially on the calendar to get the house repainted!  I can't even describe the feeling of knowing that the view of the house will be significantly less yellow! Stay tuned!