Tuesday, December 16, 2014

EVERYTHING MUST BE GOLD.

And silver. And bronze and copper. I guess everything must be just metallic :) 
This is the very first Christmas in the Haus!  I L O V E decorating for Christmas, and I love that I have a house that's suited for a big statement tree, and I have two hearths to decorate!
We splurged on a new tree [and of course it had to be gold - I still swoon when I turn it on every evening, so it was definitely a good investment], and when I was contemplating how to decorate for the season [back in August, when one normally starts thinking of Christmas..... or is that just me?] I wanted to incorporate all of the stuff I'd accumulated over the years so I don't have to buy everything new.  If I had my druthers I'm sure I could spend about $3k on just Christmas decorations :)
Pretty much everything I had was sparkly and silver - check out last year's decs at our last house here!
So I decided to add in a few more metals [bronze and gold] and include the multitude of white bird ornaments I had, and make a MidCentury Metallic Woodsy Wonderland!!! And it's so pretty!!!!!  WHY AREN'T YOU AS EXCITED AS I AM?!  
Little snippets were shared on instagram and caused a bit of a titter of people waiting for the whole shebang, and I'm happy to share it today!
Soooooo - here it is!!
In order to try to keep from spending $3k on decorations, I'm pretty cheap about stuff.  Case in point, I didn't want a big star, or a big bow, or any of the other toppers I was seeing, so I made one.  I just did a quick pinterest search for string balloon light, bought string, glue and a bouncy ball from the toy section, and made one!  Then I sprayed it gold, of course [because EVERYTHING MUST BE GOLD.] I think I spent $3.  And made a big mess.
I used all of my silver glass ball ornaments on the tree [because it's much larger than what I had before!  It ate up a lot of ornaments!] and magically found new ornaments at Hobby Lobby that fit the bill perfectly!  A few blown glass owl ornaments [left], a few mercury glass ones that have a woodgrain texture [middle] and some bronze pinecones [you can see those best in the middle].  The owl on the right was one that I already had, along with several other birds that you can't see, but are still there.  So sparkly and woodsy :)

[I found it quite funny that I put on the fireplace channel on the tv, which is about 2 feet above the actual fireplace.  It's just easier than having an *actual* fire.  Plus, it might melt my amazing, perfect, beautiful stockings!]
More of my old silver stuff!  The stockings are new, and a gift from my sister [because my Target was always out, but hers had them!  Which is good, because as soon as I figured out I couldn't have them I became slightly OBSESSED with them and knew that nothing else would ever work.]  The twigs in the vase were cut from our Bradford Pear tree in our Farmington front yard, and I've used them in my decs since about 2008 I think.  They've been white, champagne, and now this year they're - obviously - GOLD.  And to add some freshness to the mix I took some shears to one of our pine trees in the backyard and just laid it down.  Not only am I cheap, I'm also a teensy bit lazy - this time of year is insanely crazy with work, and I like when I can just take a Sunday afternoon and throw my stuff down and call it a day.  And it usually works!
I kept the dining room minimal, and also very cheap - tossed up some tinsel from Wal-Mart [a whole 98¢] and the 'falalala' sign is from Target's Oh Joy! collection for $4 [every time I go to Target I have to check that aisle - I'm a little obsessed with all of the pretty pretty colors!]  I did splurge a bit on the teensy LED lights, but only because they're amazing.  And they were only $14 on amazon, so I really couldn't afford not to.
[**don't mind the naked steps - those had to be custom ordered separate from the flooring, and they're actually being installed right as I type this!  Rocky's under my feet, all nervous from the nail gun they're using.  So a full 'we got a new floor' post will be soon!]
During a little Christmas party we recently had, the buffet became the bar, and it was the most sparkly beautiful bar everrrr.

On to fireplace number 2!
Again, kept it really simple.  My philosophy is to just add a little sparkle where there is none, and call it a day.  I didn't do a bunch of switching out of stuff - with the exception of my big teak starburst clock, everything got to stay put.  So I added - what else - tinsel and glass ball ornaments!  And a string of lights. Easy. [especially since I had laid out the lights with the intention of hanging them above the bookshelves, but decided they looked just fine on the hearth, and it took about 20x less time to just leave them there.]
Super easy tip - just fill bowls with ornaments.  It's sparkly, and hella easy. Just put big ornaments in the bottom so it fills up faster, and the smaller ones will fill around them anyway, so it looks like you have a ton in there, but it's all just a lie.

Then in the fire box I just added some ornaments around the special Ikea faux plants I have sitting in there, and that's it!
And of course the pine that I cut from the backyard, just laid out to look kinda like I had actually spent money on garland.  Thought about it, but decided 'meh.  I can just go out in my yard in my pajama pants and cut some'.  I also cut a larger branch to put in a big glass vase [with ornaments of course!  but these are plastic.  In case the branch got knocked I didn't want to have a bunch of glass to clean up.  At least not more than the usual that I have to clean up due to clumsiness.  Current count is 4 ornaments down :/]
So I have my own little Charlie Brown Christmas tree!  It's cute :)
The wreath [which my awesome sister made me a few years ago] looked a little lost, so I added the garland up top [which I already had in my stuff, so it was free!] to fill in the space and add more sparkle.  It's just up there with scotch tape.
The outside even got a touch of Christmas too!  I added two boxwood wreaths for a classy touch of green.  I want to do a lot more, but a) can't decide what to put up and how to put it up without ruining the new paint job and b) trying to rein in the extra spending since this house currently eats cash like it's chocolate.
But I love it!  It makes me look a lot classier than I am IRL. :)
Just for fun, here's a shot at night, right after I put up the tree [before the other stuff went up]:
And here's our annual Christmas card! 
So serious :)

RECAP.  Decorating for Christmas can be easy - just use the really cheap sparkly stuff and toss it around any surface that will take it!  Next year will probably look the same, but I have plans for stepping it up to the next level.  As in, I might actually buy garland and put that alllll around the fireplace, and get stuff for the outside, and just MOAR SPARKLE.  After seeing last year's decs I really miss having bowls and bowls and bowls full of ornaments, so after Christmas I'll hit up walmart and get a ton more on clearance, so I can put them on ALL THE THINGS.  
So stay tuned next year to see!!

Merry Christmas everyone!!

Saturday, November 15, 2014

Paint it, black.

I see a wood door and I want to paint it black*

The front doors were one of the [many] things about this house that we fell in love with.  Certainly unique, and definitely well-built, not to mention they were meant to be with this house.  The architect and original home owners decided on these, so there was no question that they should stay here. That kind of purposeful design is what Brandon and I are drawn to buying, and saving.  What kind of MCM enthusiasts would we be if we just replaced them with plain metal doors? [which would honestly be all we could afford. intricately designed wood double doors would not be surprisingly cheap; they'd probably make my heart stop.]
They had definitely seen better days, but were structurally sound.  Before another wet, cold winter sets upon us, I staged a door intervention to make prevent further deterioration. 
This is how they looked the day we first saw the house:
Here they were a few months ago [already I feel like the hot summer has taken some more toll - the color looks a bit more faded than last December]
 And here they are now:
 I had been brainstorming about it all year, deciding what to do [doors on or off?  what color? how the heck do I sand all this?!]  But first thing was first - we had to make them stronger, and we had to make them work better.  Over the years, lots of use had split the astragal [I learned that word from The Adam Carolla podcast, but had to google it for the spelling ;)], making the latch mechanisms less effective [so pretty much, if someone kicked reeeeally hard a few months ago, they probably could have kicked in the doors, 80s action movie style].  And while I was at it, the upper latch needed to be cleaned, as it didn't want to move at. all.]  Here's what they looked like:
 The upper part of the astragal had been split and repaired, but the lower hadn't.  So my plan was to: a. pull out all of the screws
b. pull off the whole astragal, so I could get to the latches to properly clean them
c. clamp the bottom split part and glue it back together.

Luckily, I only got to the first part when I realized it could be easier than that!  I pulled out all of the screws, then found that the upper latch worked absolutely fine.  I attributed the non-workingness of it to the bottom not being properly aligned with the slot in the floor, so the upper latch probably wasn't latching into the correct spot.  So I moved on to the clamping and gluing.
I used J.B. WoodWeld for this job, since my parents have raved about how quick, easy, and super strong it is.  And it is!  Squirt an equal bit from each tube, mix it together, apply to the spot that needs fixing, and it's done. 
 It says 'no clamping necessary' but they clearly hadn't seen my door. So I clamped it.
 Once it was dry and sturdy, I put the screws back in [I had to get Brandon to help me with this - they're 2" long screws and I, for the life of me, couldn't get them in straight.  And I have a tendency to strip screws, so I left that up to him]
BUT.  That's when my hunch about a couple of the screws proved me right.  There were these two holes at the top, on the inside [clue #1 - no other screws were visible from the inside of the house when the doors were shut, and clue #2 - they were super shiny - i.e. new]  So when those two screws were put back in, the latch didn't work again!  So at some point, the previous owner fixed a split astragal with screws.
 And when they did that, they essentially screwed the latch shut:
 So I kept out the screws, scraped out the bit of wood putty that was in the crack with a knife, and put that WoodWeld in there too.  Done!

Now I could get to the bigger job - the painting.  Which of course involves a ton of prepping, especially with these doors. These doors were covered in a veneer, which when outside, needs a lot of maintenance.  So over the years, day after day of the hot afternoon sun had shriveled up that veneer, and it had to all come off.  Here's an instagram pic of the day I started:
 It came up pretty easily, especially on the bottom 2/3 of the door.  I also used a utility knife around the trim pieces to try to get a really clean line. 
And after hours of scraping, here's what they looked like:
 While I was scraping [and cutting and scraping and cutting and scraping], once I got to the bottom of the door I came to the bottom trim piece.  It has always bothered me.  For one, it was kind of coming off of the right door [there was about a 1/2" gap] and two, the spacing seemed off.  It just didn't seem to belong:
 I was certain it wasn't original to the door, so I ripped that sucker off. [and quite easily, I might add]
The two-toned aged veneer underneath justified my decision:
 With a door as purposefully laid out as these, the spacing around the edge of the trim should have been the same all around the door.  And it was!  Originally, anyway.  I just figure the bottom of the door, which sees the most exposure to the elements, was the first to decay.  So the original trim piece came off, and a bigger one went on, to cover up the old veneer.  Most likely because someone knew the H U G E job it would become to take all of the veneer off.  But I was there to restore, renew and refresh, so I ripped off that old veneer too. [again, quite easily.  I just pulled it off with my hands - no scraper needed]
 So!  After all the old veneer came off, the whole thing got a good sanding, which I did with the Black & Decker Mouse, and its nifty pointed surface [for all of the tiny areas that make up this door].  So - that bottom trim that I had ripped off?  It turned out to be walnut, super sturdy, and aside from the weathered outside, very strong.  So I took the pieces over to my Dad to have him rip them down to the size they originally would have been. [bonus of moving back to your hometown: access to all of Dad's power tools, and Dad to use them for you ;)]
And after the good sanding, and some small holes filled, they looked like this, #nakedandafraid:
 I then primed the doors with my favorite primer, tinted gray:
 Which revealed that all of the tiny nail divots showed up a lot more than I thought they would, so I caulked them along with mitered corners, and of course where the trim meets the door [I should be able to power wash these doors, and no water will creep in to destroy them]
 Then - FINALLY - it was painting day!  [which I teased on instagram - seriously, why aren't you following me?  You're missing out on all sorts of food and dog pics, and occasionally a house pic :)]

I used Rustoleum Topside Marine Paint, because it's meant to withstand a lot of extreme weather.  I definitely don't want to have to sand and paint every couple of years - I want this to LAST.  
Why black?  I also debated on this a bit - a fun color would be nice!  But honestly, I can't think of a color I'd want for the doors that I'll love for years. And again - I don't want to have to do this again for a long time.  Plus I fell in love with the classic black lacquer doors in London, so I didn't have to waffle on colors for very long :)  On it went!

 And that, my friends, took a loooong time.  I'm using a 2" brush in that pic, but ultimately ended up using a 1" brush.  The smallest little rectangles are about 1.5" wide, and the small brush allowed me to be super anal about brush stroke direction, which ultimately makes for a smoother, prettier paint job.  I thought about a sprayer, but some of the trim pieces [like in the left half of the pic above] are 90 degree angles, so I felt that would also take a while, and cause for more drippage possibility. 
 So I painted my double front doors with a one inch brush.  Three times.  And in the spring [once I have a bit of separation from the project and my eye doesn't twitch when I think about it] I'm gonna put an other coat on, just so it's suuuuper glossy and smooth.  
Just for fun, I made a gif of the different stages!

While I was on the black door kick, I turned my sights to a back door of off the kitchen.  It, too, was a solid wood door with an aging veneer:
 Nothing was wrong with it structurally, so it got a good sanding and a coat of paint:
 [but this time I got to use a big roller for the job, so each coat - one of primer, and one of paint - only took about 5 minutes]

Much better, and cleaner :)

Google images shows album covers that say "Paint it, black" and "Paint it black"  Those Rolling Stones are never going to get anywhere in their careers if they can't get their shit together over something like how to spell a song title....

Tuesday, November 11, 2014

Confessions of a color snob.

So when we bought the house, we both agreed that the outside has amazing lines, and we loved everything about it - the L-shaped layout, aaaalllllll the windows, the double doors, and the eaves with a 3' overhang.  It was all gorgeous, except for the color.  It was some sort of a pinkish beige, with a yellowy cream trim.  I understand the decision behind the color - picking something that sort of matches the limestone that covers most of the front - but dudes, it was bad.  It looked like this:
 So this summer we hired a house painter to paint everything, and it made a WORLD of difference:
 But I have a confession to make.  As soon as the gray went up, I sort of hated it.  As in, when my husband texted me a photo of the front as soon as he got home to see it [I was in Colorado shooting an amazing wedding] I immediately thought "that looks preeeetty blue..."  But I had picked the color, and I tried to pick one that was more neutral with a greenish tinge, so maybe since it was dusk when he took the pic, that made it look more blue.  But I got home from my trip and it still looked blue.  I tried to convince myself that it was fine - no one else seemed to be bothered by it.  But every time I looked at it, I couldn't make myself like it.  I didn't want a blue house.  This pic above doesn't look blue, because I photoshopped it to be less blue [probably because I'm vain and didn't want anyone to think I could pick a wrong color]  The real color looked more like this:
 B L U E.
And the thing is, it's not cheap to get your house painted.  And he did a great job - everything looks amazing.  It's all my fault, because I picked the wrong gray [It was called London Road, so that may have swayed me.  I'm a tiny bit of an Anglophile, so I thought it was fate.  ...it wasn't.]
So I went to Lowe's and picked up a few of their little 8 oz. samples in 4 colors, and painted large swatches on the house, and studied it at all times of day, in different light.  You'll notice there are only 3 swatches, because #4 would. not. open.  As in, I have a huge blister scar on the palm of my hand because it never opened.  Even Brandon couldn't get it open, and even the plastic of the container was bending, but the friggin lid never came off [so if you get little samples mixed, have the person at the paint counter open it and then close it again, but less tightly - the other three were crazy hard to get open too]
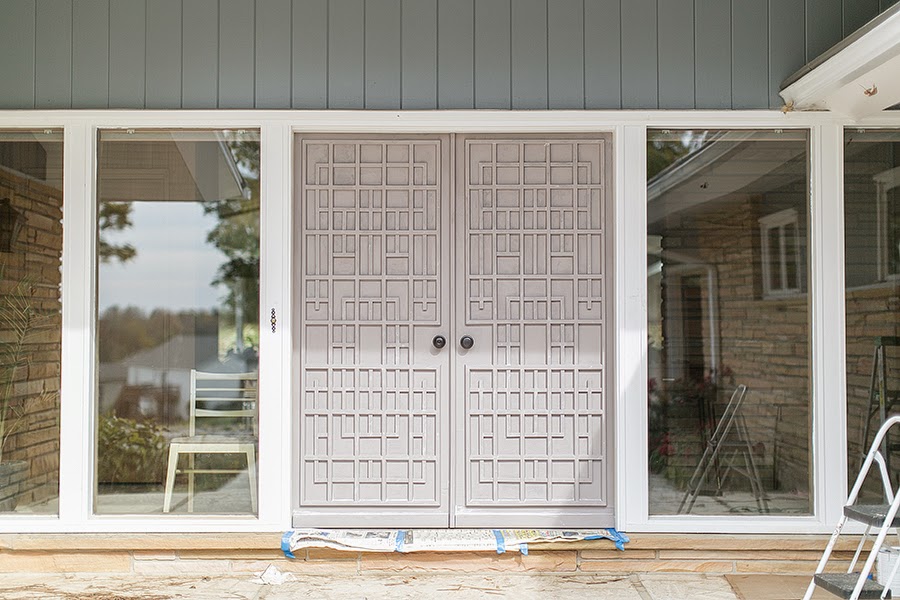
[you may notice that the doors look a bit different.  sometimes I have to work on little bits of everything at the same time, so it's a little bit of a spoiler for you :)]
 [the foyer was a mess because we were also getting NEW FLOORS in the dining room and living room - another spoiler!  post coming soooon!]

 And the day before Halloween the weather was forecast to be sunny, 60 degrees, and slightly breezy.  Lucky for my mom [or, maybe unlucky] it was also her day off!  So we repainted the gray part.  #2 ultimately won [it's Porcelain Shale in the Valspar Signature line], so we covered up that blue paint and made quick work of it. [less than 5 hours and only one gallon of paint!  crazytown.]
 We also painted the garage doors, because I finally had decided what to do [white? gray? black?  I'm a serious waffler, so that decision took a while].  After reading the post from [the sadly defunct] Young House Love, I was pretty confident I could do it.  And it was super easy!  I pried off the rubber weather stripping first, then we wiped down the doors with a deglosser to clean & prep, then primed them [I keep a gallon of Zinsser B-I-N for pretty much everything.  It's pricey, but man is it amazing!  I have it tinted to a medium gray and it's perfect for just about every job.]  Then painted that Porcelain Shale over the almond color. The next day I nailed the strips back on, and with the doors open, painted it all white, and now it's done.  And I can finally love the color of my house.
 I sure a lot of people thought I was crazy.  "I'm going to paint my house this week"  "Oh?  What color?"  "Gray"  "What color is it now?"  "Gray"
But the people who have known me for a long time aren't surprised.  I've been known to paint a room just a *slightly* different color.  Because if it's just a teensy bit too warm or too cool than what I'm picturing, I'll hate it.  Good thing I like to paint!
 This is the color the house is meant to be.  Finally unified, and dignified.